Archive for the ‘JPG to PDF Pro tutorial’ Category

How to create a gallery in a PDF file?

This tutorial will show you how to create a gallery in a PDF file of your JPG images. Of course, instead of JPG images you could have images of other file formats such as PNG or BMP or GIF – with JPG to PDF Pro you can use any of those images and combine them.

This assumes that you have installed the JPG to PDF Converter JPG to PDF Pro already on your computer. If not you can download the free JPG to PDF software here.

Once you have started JPG to PDF Pro you can add images to the thumbnail view by either dragging and dropping them from your Windows Explorer or by selecting the “Add files” or “Add folder” options in the menu or the respective tool buttons.

Add files toolbar icon  in JPG to PDF Pro Add folder icon  in JPG to PDF Pro

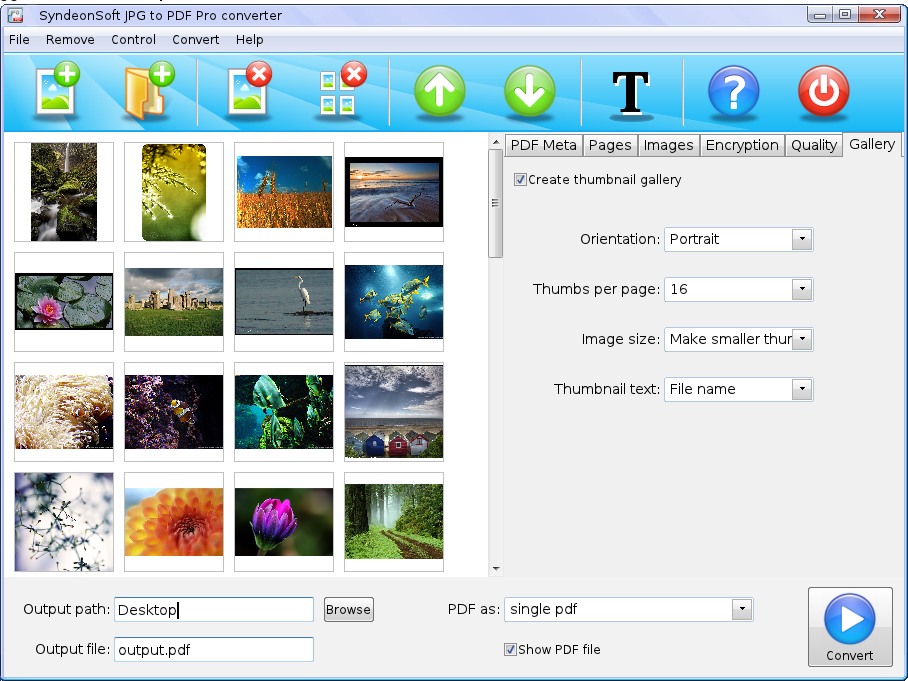
Once you are happy with your selection and the order in which they are displayed you can click on the “Gallery” tab and activate it by enabling the “Create thumbnail gallery”.


Close up view of the thumbnail gallery view in JPG to PDF Pro

Here you can select the orientation of the page and how many thumbnails you want to have printed per page in your PDF gallery.

Also you can select if the images should be resized and reduced in quality. This will create much smaller PDF gallery files and works very well if you have more than four thumbnails per page. If you select four or less thumbnails you can of course still try to reduce the size but you should check the results and make sure that your are satisfied with the image quality. Otherwise simply select the “Keep original size” option and all images retain their full quality.

The last option is to select if you want to have the file name (and optionally path) printed along with the image.

After adjusting the settings to your needs click the “Convert” button and JPG to PDF Pro will convert the listed image to a thumbnail gallery in a PDF file.


Convert button to convert the selected images into a PDF file in the software JPG to PDF Pro

How do I make a photo gallery from JPG images as a PDF file?

With JPG to PDF Pro it is easy to create PDF photo galleries. All you have to do is select the JPG images which you want in the gallery and drag them into JPG to PDF Pro. Alternatively you can also use the file or folder import either from the menu File-> Add File or File -> Add Folder or using the respective toolbar icons:

Add files toolbar icon  in JPG to PDF Pro Add folder icon  in JPG to PDF Pro

Now switch to the gallery tab and enable the “Create thumbnail gallery” check button.


Selected images in JPG to PDF Pro in the thumbnail gallery view

Let’s have a closer look at the gallery tab:


Close up view of the thumbnail gallery view in JPG to PDF Pro

  • Here you can select how the thumbnail gallery will be printed. Select the orientation to print the PDF pages either in portrait or in landscape mode.
  • Then select how many thumbnails you want to have printed per page. You can choose up to 25 thumbnails per page.
  • Next you can select if JPG to PDF Pro should resize the images so as to use less space. If you use many thumbnails per page you should use the option “Make smaller thumbnails”. If you print only 2 or 4 thumbnails you might want to keep the original size instead in order not to loose any graphical details.
  • Finally you can choose if the file name should be printed under the thumbnail image or not.

Choose the name of the output file and its location:


bottom panel to select location and file name of the output PDF file in JPG to PDF Pro

Now you can click the “Convert” button:


Convert button to convert the selected images into a PDF file in the software JPG to PDF Pro

The generated thumbnail gallery from JPG images will be created as a PDF file in just a few seconds.

Have fun exploring the many possibilites JPG to PDF offers in creating thumbnail galleries from JPG and other image formats.